Define the removable part before setting up
Cleaning a hood’s metal grease filter is a small maintenance job with a consequential final step: putting the panel back securely. A cleaner-looking mesh is only one part of success. The filter must remain undamaged, dry as required and properly engaged in its supports. Treat removal, washing, drying and refitting as one job rather than leaving the last stage to whoever next cooks.
Start with the exact regional owner manual and any applicable filter accessory instructions. Confirm that the panel is metal, that it is user-removable and that the intended hand-cleaning method is permitted. This article does not establish permission for an unidentified filter, a carbon insert or an assembly that requires tools beyond the stated user procedure.
Bosch’s regional hood-cleaning pages provide general maintenance context; the US page includes a hand-cleaning route for metal filters. Your model document supplies the access, isolation, cleaning and refitting details that a general page cannot resolve. If your instructions allow a different method only, follow those instructions or obtain clarification. Do not improvise a household substitute just to complete the job today.
1. Prepare a safe landing place and a complete sequence
Read the removal and refitting diagrams before touching the latch. Locate the specified isolation method and cooling requirement. Switch off and disconnect exactly as instructed, without opening electrical covers or handling fixed wiring. Let the hood and adjacent cooking surfaces cool. A fan that has stopped moving is not proof that the appliance has been isolated for maintenance.
Clear cookware from the area beneath the hood. Set up a stable, protected landing place large enough for the whole filter and a separate drying area. Check that you can support the panel comfortably without leaning over a hob or balancing on furniture. If the installation makes safe user access impractical, arrange help rather than stretching for a latch.
Gather only the cleaning materials the manual permits. Keep the applicable instructions available with dry hands and plan enough time for drying before cooking resumes. Decide where any removed panel will stay so it cannot be stepped on, bent or mistaken for a tray. Tell other household members that the hood is temporarily unavailable; a missing filter should not become an unnoticed operating condition.
2. Support the panel before releasing its latch
Observe the fitted orientation from the permitted viewing position. A simple photograph or sketch can record which edge carries the latch and where the opposite edge rests. Number multiple panels in your notes by position, without adding adhesive or markings that the manufacturer does not allow. Separate any pre-existing looseness from damage that would make removal unsafe.
Support the filter’s weight with one hand as shown in the manual, then operate the release in the specified direction. Follow the documented tilt, slide or lowering movement. Do not pull on the mesh, twist a frame to clear a bracket or assume another model’s spring latch behaves the same way. Keep fingers away from sharp edges.
Stop if the panel remains caught, the release does not match the illustration or an unexpected component moves with it. Do not reach through the opening toward a motor, wiring or duct. Put the assembly back securely if that can be done within the instructions, and seek advice. A reluctant panel is an access problem to resolve, not an invitation to increase force.
3. Clean the permitted surfaces and inspect the frame
Place the removed panel where it is fully supported. Follow the manual’s permitted water temperature, cleaner, contact time and tool restrictions. Where your model permits gentle hand washing, work without crushing the mesh or levering at joints. Do not add a strong degreaser, abrasive pad or prolonged soak simply because the residue is stubborn. Compatibility takes priority over speed.
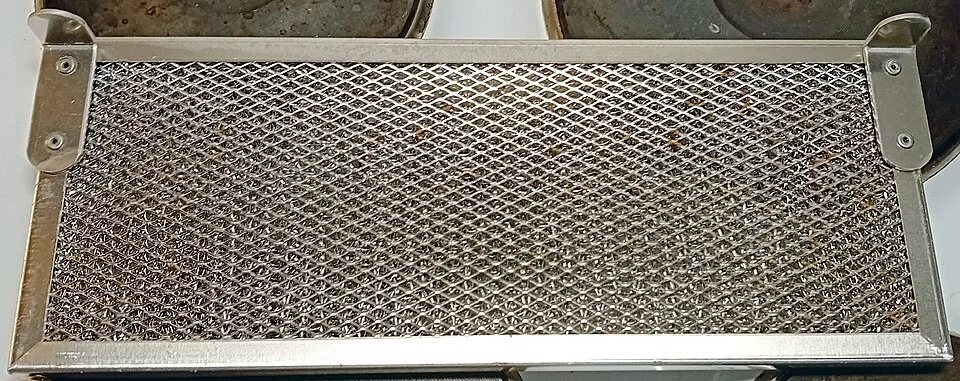
The removed panel exposes layered mesh, the surrounding frame and mounting brackets as separate features to inspect. Follow the exact manual’s permitted cleaning method and access instructions, then distinguish remaining discoloration from damage or obstruction. The photograph does not authorize dishwasher cleaning, establish material compatibility or prove extraction performance.
Photo & usage
Unknown authorUnknown author · CC BY-SA 4.0 · Source. Display copies resized and encoded as WebP; no instructional details were fabricated or removed.
Rinse as the model instructions require, keeping the cleaning work away from the appliance and electrical parts. The hood itself is not a wash basin. Do not spray liquid through the vacant opening, flood the housing or wipe inside inaccessible mechanisms. A separate carbon component must not enter this process unless its own identified instructions explicitly allow the treatment.
Inspect the accessible panel frame, mesh and latch after cleaning. Distinguish remaining discoloration from sticky residue, and distinguish both from tears, separated layers, bent supports or a broken release. Colour alone is a poor completion test. Damage that prevents secure fitting or changes the assembly calls for the correct replacement or service advice, not another round of aggressive cleaning.
4. Reserve drying time without inventing a deadline
Drain and dry the panel according to the exact instructions. Support it so that the frame cannot warp and any permitted drainage is contained. Do not speed the process with an oven, direct heat or compressed air unless the specific document authorizes that method. A surface that looks dry may still have moisture caught within layers or edges.
Here is an illustrative scheduling comparison, not a prescribed drying time. Suppose removal and preparation take 12 minutes, permitted washing and rinsing take 18 minutes, and refitting checks take 10 minutes. Active work totals 12 + 18 + 10 = 40 minutes. A household with only a 30-minute gap before cooking is short by 10 minutes even before any drying interval is included.
That calculation cannot tell you when a real filter will dry. It demonstrates why a short gap is a poor plan. Reserve a longer period consistent with the manual and actual conditions, then assess dryness as directed before refitting. If the panel is still wet, the task remains open. Do not operate the hood without a required filter to rescue an overambitious timetable.
5. Refit the dry panel and check engagement
Return each panel to its documented position and orientation. Engage the supporting edge or tabs first if the manual specifies that sequence, then close the latch as illustrated. Keep supporting the weight until engagement is confirmed. Do not substitute tape, wire, wedges or an improvised fastener for a failed catch. Those additions conceal an unresolved fitting problem.
With power still isolated, perform only the seating check allowed by the instructions. Observe whether edges sit as shown, whether all intended catches are engaged and whether the panel is supported without a visible gap or sag. Do not tug hard to prove strength. If the latch will not stay engaged or the frame does not sit correctly, remove and reassess only through the permitted procedure.
After every required part is fitted, clear tools and cleaning materials and restore power as the manual directs. Any ordinary operational check comes after assembly, never with hands in the opening. If a new rattle, vibration or loose panel appears, stop use and return to safe isolation before seeking advice. Do not hold a moving or energized assembly in place while trying to identify the sound.
Close on condition and fit, then record the outcome
Write the date, filter identity, manual reference, permitted cleaning method and result. Record remaining staining separately from structural damage and secure seating. A useful closing entry might say that deposits were reduced, no visible frame damage was found and the dry panel engaged as illustrated. Do not claim that extraction has been measured or that indoor air quality is now acceptable.
If the original symptom was persistent cooking odour or unusual noise, keep it as a separate follow-up question. A completed filter clean does not diagnose the duct route, fan, carbon accessory or installation. Repeatedly washing the same panel is not a useful response to a symptom that remains after appropriate care. Preserve the observation for a model-specific service request.
Completion means that the permitted cleaning sequence is finished, the filter is dry and secure, and the hood can be used in its documented configuration. If any of those conditions is unresolved, record the limitation and keep the appliance out of use where safe assembly is in doubt. A controlled stop is a valid maintenance outcome, especially when it prevents a damaged catch from becoming a falling panel.
THE REFERENCE FILE
Sources & scope
Documentation reviewed 1 Nov 2026. Examples are illustrative; this article does not claim hands-on product testing. Follow the instructions for your actual material, model and location.